Monday, June 24, 2013

Ryan Homes Driveway Expansion and "$300 Concrete Guy"

[Rewriting for clarity]... Our old house had a strangely shaped driveway and this time we wanted an idiot proof driveway. All homes here have side entry garages. Last phase (Covington) 12 feet wide driveways were the standard, and 16 wide in our phase (Palmer). Parking pad is 27x18 for 2 car, and 27x27 for 3 car side entry garages. Hopefully wider driveways may cut down on street parking.

Going over blogs, many people wrote, "pay the concrete guys 300 bucks on the side to make the driveway wider." Well, folks, I am not sure whether this works for many people besides the guy who came up with it. Here there are inspections for just about everything, including concrete, which from what I understand has to match the topographic design created by the engineer, which includes the driveway.. So the driveway has to be written into the contract and paid for up front..

We wanted both sides of the driveway to be even and symmetrical from start to finish (standard is 16 feet at sidewalk gradually widening to 20 feet at pad).. So we asked to widen the driveway and agreed to pay for it. An initial design increase to 18 was pretty good, but then I ran into the driveway guy website and became convinced I needed a 20 foot wide driveway. So we we asked our SR to change to that and he kindly changed it.

Curse you Google maps for giving us costly ideas.. Thus born the hammer head extension, which allows for reversing into, then correcting and driving straight into the street, instead of reversing all the way down (grass knows our driving skills, and trembles in fear every time we get in a car). The typical hammer head is 10x12. To allow us to park our van and keep it out of the way we made the hammer head 10x18.

Looking some more at Google maps for similar hammer head driveways convinced us to to go back to our extremely helpful and patient SR and requested changing the 10x18 hammerhead to 20x20, and promised this would be the last change.. Maybe we can park two big cars without losing an inch of parking pad space, and to maybe it will also double as a basketball court... It is a big family.

Final dimensions are: 24 ft wide at apron, 20 ft wide driveway. 27x18 parking pad extending into a 20x20 hammer head. Distance from apron to end of hammer head is exactly 98 ft.. Or 88 ft from side walk.. At over 2,000 sqft, this monster covers about 12% of the lot, certainly larger than the house.

So when the final topo came back from the engineer, our SR sent the topo below with one sentence "you could land a plane on this!" Also in preconstruction meeting our PM commended widening the driveway and the hammer head and said that we would totally find it worth the investment and would pay off in added convenience.

This is what we traded the fancy fireplace for. I just wish we had made the hammerhead extend all the way to the house...


Thursday, June 20, 2013

Roofing a Completed Frame

Since last week the framing has been completed. AAA for speed without a doubt, but I have seen some quality issues. We 'get it.' This will not be built as finely as if we did the work ourselves, but I was hoping for better quality control.

There were lots of cracked/broken/half rotted pieces of wood that one would think would be replaced, along with some obvious spaces in the framing were it really should be flush. I have an ex-coworker who is now a custom builder in the area, and I know from a friend who built with him that he would return any piece of wood that was not perfect, He is also much more expensive..

Marvin and his Amish CT Construction crew were framing the house next to us when I stopped by to thank him for what they have done with our house. He said, "You got a roof today." And lo and behold, I look up and see that we have a roof indeed! It looks very black and sharp, don't know how else to describe it.

We also met the neighbors building the Courtland Gate being framed next to us (visible in one of the pictures below, the house not the neighbors). Very nice people and hail from far-away-lands-across-the-ocean like us. We exchanged some ideas and information, along with our off-track build schedule. It was a pleasant meeting all together and very nice folks, very glad to have them as neighbors.

Basement gets poured tomorrow, assuming ground works pass inspection today. I wonder if many people read all this gibberish or just skim through the pictures. So here is a sentence to test that, "Not thrilled with the level of communication at the moment. Emails to PM seem to go into a black hole. Didn't get a weekly update last week either. I get that RH has him building a bazillion homes and he is busy and we may sound like whiny children for a Master Builder who's built hundreds of homes and has seen it all before (meant truthfully, no sarcasm involved, the man is nice and easy to work with, and provided us with the most comprehensive build schedule anyone but PMs have ever seen). But we are bleeding to pay for this home, and we would not complain without cause. There is a higher than EPA recommended level of Radon in this Palmer Village development that Ryan Homes does not address (of course they have a blanket disclaimer in all agreements about not testing for or being responsible for naturally occurring gases and materials). Ryan Homes will not help us setup a pipe under the basement slap for future use in a Radon Mitigation system in case it is found in our home, even when we offer to pay for it ourselves." So there goes..

and here are some pictures..


Friday, June 14, 2013

Framing Day 4

The rain from the storm did not seem to have an adverse affect on the house. As many have kindly pointed out, "if it will rain it will rain, and if there is damage it will be fixed, and there isn't much one can do about it, and it happens to all houses." So We are grateful God saved this little house from damage. There are pools of waters outside, and lots of mud everywhere from the framers going in and out, but that's expected. Marvin, the team lead said they will be close to done on Friday, but will need one more day.

The surprise of the day was seeing that they had framed the skeleton for the bonus bedroom, and we found that it makes a major change in house the house looks. It is also much larger on the inside that we expected.


2nd floor panorama from our favorite room, bedroom 4 with an extra window

bonus bedroom

and a shot from the basement into the heavens..

Thursday, June 13, 2013

Second Story vs. Severe Storms

The Amish framing team are miracle workers. Yesterday they completed the first floor, installed windows, and moved to finish most of the second floor. The bonus bedroom in the Victoria Falls is rarely done, maybe that's why they did not do it yesterday, trying to figure out what's the easiest way of putting it together.

Then at about 10PM it started raining and storming with hurricane/tornado force wind and all that. Our mini version of a really big bad storm. So the house is probably ready to grow sprouts if we apply miracle grow.. Will check out the damage after work. The workers left the windows open, and I didn't think of closing them (hey, maybe it was done for a reason). Here is a newspaper picture of the actual storm from a few streets down.


and this is how things looked before the storm started


and two second story panoramas..


Wednesday, June 12, 2013

Framing First Floor

Framing began on the house, and within a single day we went from a sill plate to a nearly finished first floor. The team of 8 Amish workers did an incredible job in  such a short amount of time. The team lead was very nice and informative. They start at dawn like clockwork, and at 3 PM sharp they put away the tools and drive home. Here are some pictures..

Back of house (family room, morning, dining)

Rear half of house from center showing (dining, kitchen, morning, family room)

Front half of house showing (family, office, mud, garage, foyer, kitchen, morning, dining room)

Victoria Falls Office and Mudroom. We switched the laundry to the office to save the mudroom.

Stairway to heaven

Sunday, June 9, 2013

Sill Plate, Air-Beam, Crack-Crete Answered

Note: Rewriting this post in a way that makes more sense.

Sill plate. 2x6 wood used for setting up the sill plate, to 2x4.. On three sides of the house used two layers of 2x6 wood. When they got to the part of the wall outside the office and next to the garage, they  switched to 2x4 wood, and the entire front of the house is using 2x4 wood for the sill plate. PM later explained this is to leave ledge support room to set the full bricks front. That was easy.

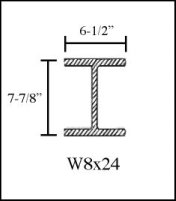
Half of the plate on one beam is on 2x6 and the other is 2x4. Explanation: For some unknown reason RH joins two beams of different size to form one span. W18x18 is 5 1/4 wide, and it has 2x6 on it, joined to a W18x10 which is 4" wide and has 2x4 sitting on top. I posted some pictures showing the specifications of the different beams used in this house.


Pictures below show the beams being used. Splice plate above joins W8x18 and W8x10 beams.


Next, as you may have observed from looking at your own build, the sill plate sits on top of the basement concrete walls, and is bolted down to the top of the wall using the concrete anchor bolts. So what happens when you use 2x4 instead? Those bolts will reside in the imaginary 2 missing inches, and the sill plate 2x4 will be secured down to the top of the basement wall with Holy Air! If a bolt is too close, whack it out of the way like so..  

Explanation: This space was left to form brick front support. The bolts were cut later (I get this but don't fully buy it).


The longest span beam is completely touching the right side of the house (Family Room/office wall) while leaving space away from the far wall (living room side). There are some steel plates underneath it at the office/family room side, but they are loose and not attached at all, so the beam might be sitting on air for all that I know. Will those be welded? Is that the final position of the beam?

Explanation: None. But when I checked later the plates were very secured due to the weight of the house above. Will ask about welding them.


The basement wall below shows a sizable crack in the concrete  wall going across three seams, we'll wait and see how large it gets.. This is the largest of 4 concrete wall cracks we counted. Explanation: Crack is the result of concrete drying too quickly when switching concrete trucks. They tried to avoid it but it happens sometimes. Will touch up later.


Other than that, some kids enjoyed a visit to some site..

Thursday, June 6, 2013

Daily Build Photos (moved to Pictures page)


5/21/2013 - Staked
5/22/2013 - Excavated
5/24/2013 - Ready for Footers
5/28/2013 - Footers poured in (no pics, missed it)
5/29/2013 - Concrete forms Walls up in preparation to pour in the basement walls
5/31/20 13 - We appear to have a house.. or a clearly identifiable basement, and it is high, and tough, and rough, and looks absolutely beautiful!
6/04/20 13 - Waterproofing. Ha. Lots of rain. Our basement is a swimming pool.
6/05/20 13 - Electrical run from street. Rough grading, excavation space around house filled.

We visited on Saturday afternoon with dad and ran into the owner of SNAP Construction Enforcement, the contractor who did the concrete forms and drain pipes. They were installing our concrete forms on our neighbor's house (excavated on 5/29). We talked for a little bit and he was very pleased with and proud of the end result of their work on our house. We praised how great their work looked, and he explained a few things about what goes into the process and some cleanup his crew still has to do. He also spoke highly of our PM and how easy he is to work with. It was all good.